

一淘模板这里说的Node是一个基于ChromeV8引擎的JavaScript运行情况,通罕用于建立收集应用程序。它能够同时解决多个连接,而且不像其余年夜少数模子那样依靠线程。
对于Web开辟者来说,从数据库或者Web效劳器获取数据,而后输入到Excel文件以停止进一步剖析的场景时有发生。咱们的技术团队在跟海内外各行各业用户交换的进程中,就曾经发明有患上多的用户试验在Node.js的情况下运行SpreadJS 纯前端表格控件,借助该控件,能够在效劳器不预装任何Excel依靠项的状况下,收罗用户输入的信息,并将其主动导出到Excel文件中。
为了满足空阔技术喜爱者的需要,同时缩小人人在未来技术选型方面所走的弯路,本文迁就SpreadJS与Node.js之间的技术性计划停止探讨!
首先,咱们需要布置Node.js以及Mock-Browser,BufferJS以及FileReader,人人可曩昔往下列链接停止下载,同步操纵:
InstallingNode.jsviaPackageManager
Mock-Browser
BufferJS
FileReader
咱们将应用VisualStudio建立应用程序。关上VisualStudio后,应用JavaScript>Node.js>BlankNode.js管制台应用程序模板建立一个新应用程序。这将主动建立所需的文件并关上"app.js"文件,也是咱们将要变动的惟一文件。
对于BufferJS库,您需要下载该软件包,而后通过导航到名目文件夹(一旦建立)并运行下列命令,将其手动布置到名目中:
npm install布置实现后,您能够需要关上名目标package.json文件并将其增添到"dependencies"整体。文件内容应下列所示:
{ "name": "spread-sheets-node-jsapp", "version": "0.0.0", "description": "SpreadSheetsNodeJSApp", "main": "app.js", "author": {"name": "admin" }, "dependencies": {"FileReader": "^0.10.2","bufferjs": "1.0.0","mock-browser": "^0.92.14" }}在此示例中,咱们将应用Node.js的文件系统模块。咱们能够将其加载到:
var fs = require('fs')为了将SpreadJS与Node.js联合应用,咱们还需要加载已经布置的Mock-Browser:
var mockBrowser =require('mock-browser').mocks.MockBrowser在加载SpreadJS剧本以前,咱们需要初始化模拟浏览器。初始化咱们稍后在应用程序中能够需要应用的变量,尤其是"window"变量:
global.window =mockBrowser.createWindow()global.document = window.documentglobal.navigator = window.navigatorglobal.HTMLCollection =window.HTMLCollectionglobal.getComputedStyle =window.getComputedStyle初始化FileReader库:
var fileReader = require('filereader');global.FileReader = fileReader;将SpreadJS布置文件中的SpreadJSSheets以及ExcelIO包增添到名目中。
您能够通过右键单击解决心划资本治理器的"npm"整体并将它们增添到您的名目中,而后抉择"布置新的NPM软件包"。您应当能够搜寻"GrapeCity"并布置下列2个软件包:
@grapecity/spread-sheets@grapectiy/spread-excelio将SpreadJSnpm软件包增添到名目后,准确的依靠瓜葛将被写入package.json:
{ "name": "spread-sheets-node-jsapp", "version": "0.0.0", "description": "SpreadSheetsNodeJSApp", "main": "app.js", "author": {"name": "admin" }, "dependencies":{"@grapecity/spread-excelio": "^11.2.1","@grapecity/spread-sheets": "^11.2.1","FileReader": "^0.10.2","bufferjs": "1.0.0","mock-browser": "^0.92.14" }}现在咱们需要在app.js文件中引入它:
var GC =require('@grapecity/spread-sheets')var GCExcel =require('@grapecity/spread-excelio');应用npm软件包时,还需要配置许可证密钥(点击此处,收费申请许可证密钥):
GC.Spread.Sheets.LicenseKey =""在这个特定的应用程序中,咱们将向用户显示他们正在应用哪一个版本的SpreadJS。为此,咱们能够引入package.json文件,而后盾用依靠项以获取版本号:
var packageJson =require('./package.json')console.log('\n** Using Spreadjs Version"' + packageJson.dependencies["@grapecity/spread-sheets"] +'" **')点击此处,下载现成的Excel模板文件,该文件蕴含了从用户那边获取数据。接下来,将数据放入文件中并导出。在这种状况下,文件是用户能够编纂的状态。
初始化事件簿以及ExcelIO变量:
var wb = new GC.Spread.Sheets.Workbook();var excelIO = new GCExcel.IO();咱们在读取文件时将代码包装在try/catch块中。而后,初始化变量"readline",让您读取用户输入到管制台的数据。接下来,咱们将其存储到一个JavaScript数组中,以便轻松填写Excel文件:
// Instantiate the spreadsheet and modifyitconsole.log('\nManipulatingSpreadsheet\n---');try { var file = fs.readFileSync('./content/billingInvoiceTemplate.xlsx'); excelIO.open(file.buffer, (data) => { wb.fromJSON(data); const readline = require('readline'); var invoice = {generalInfo: [],invoiceItems: [],companyDetails: [] }; });} catch (e) { console.error("** Error manipulating spreadsheet **"); console.error(e);}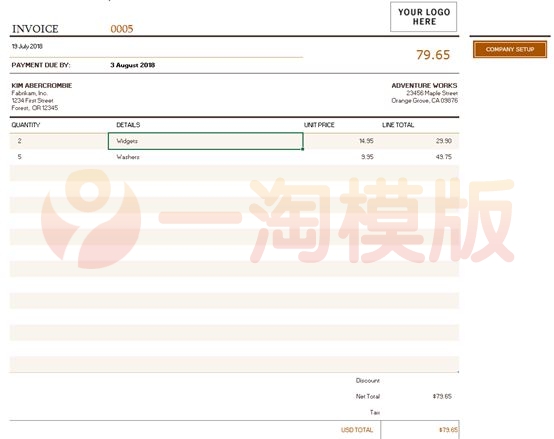
上图显示了咱们正在应用的Excel文件。咱们能够在excelio.open调用中建立一个单独的函数,以在管制台中提醒用户需要的每一项内容。咱们也能够建立一个单独的数组,将数据生存到每一个输入后,而后将其推送到咱们建立的invoice.generalInfo数组中:
fillGeneralInformation();function fillGeneralInformation() { console.log("-----------------------\nFill in InvoiceDetails\n-----------------------") const rl = readline.createInterface({ input: process.stdin, output: process.stdout }); var generalInfoArray = []; rl.question('Invoice Number: ', (answer) => { generalInfoArray.push(answer); rl.question('Invoice Date (dd Month Year): ', (answer) => { generalInfoArray.push(answer);rl.question('Payment Due Date (ddMonth Year): ', (answer) => {generalInfoArray.push(answer);rl.question('Customer Name: ',(answer) => { generalInfoArray.push(answer);rl.question('CustomerCompany Name: ', (answer) => { generalInfoArray.push(answer);rl.question('Customer Street Address:', (answer) => { generalInfoArray.push(answer); rl.question('Customer City, State, Zip (, ): ', (answer) => {generalInfoArray.push(answer); rl.question('Invoice Company Name: ', (answer) => { generalInfoArray.push(answer); rl.question('Invoice Street Address: ', (answer) => { generalInfoArray.push(answer); rl.question('Invoice City, State, Zip (, ): ', (answer) => {generalInfoArray.push(answer); rl.close(); invoice.generalInfo.push({ "invoiceNumber": generalInfoArray[0], "invoiceDate": generalInfoArray[1], "paymentDueDate": generalInfoArray[2], "customerName": generalInfoArray[3], "customerCompanyName": generalInfoArray[4], "customerStreetAddress": generalInfoArray[5], "customerCityStateZip": generalInfoArray[6], "invoiceCompanyName": generalInfoArray[7], "invoiceStreetAddress": generalInfoArray[8], "invoiceCityStateZip": generalInfoArray[9],}); console.log("General Invoice Information Stored"); fillCompanyDetails();});}); });});});});});}); }); });}该函数被称为"fillCompanyDetails",目标是收罗无关公司的信息以添补到事件簿的第二张表中:
function fillCompanyDetails() { console.log("-----------------------\nFill in CompanyDetails\n-----------------------") const rl = readline.createInterface({ input: process.stdin, output: process.stdout }); var companyDetailsArray = [] rl.question('Your Name: ', (answer) => { companyDetailsArray.push(answer); rl.question('Company Name: ', (answer) => {companyDetailsArray.push(answer);rl.question('Address Line 1: ',(answer) => { companyDetailsArray.push(answer);rl.question('Address Line 2: ',(answer) => { companyDetailsArray.push(answer);rl.question('Address Line3: ', (answer) => { companyDetailsArray.push(answer);rl.question('AddressLine 4: ', (answer) => { companyDetailsArray.push(answer); rl.question('Address Line 5: ', (answer) => { companyDetailsArray.push(answer); rl.question('Phone: ', (answer) => { companyDetailsArray.push(answer); rl.question('Facsimile: ', (answer) => { companyDetailsArray.push(answer);rl.question('Website: ', (answer)=> { companyDetailsArray.push(answer); rl.question('Email: ', (answer) => {companyDetailsArray.push(answer); rl.question('Currency Abbreviation: ', (answer) => { companyDetailsArray.push(answer);rl.question('Beneficiary: ',(answer) => { companyDetailsArray.push(answer); rl.question('Bank: ', (answer) => {companyDetailsArray.push(answer); rl.question('Bank Address: ', (answer) => { companyDetailsArray.push(answer); rl.question('Account Number: ', (answer) => { companyDetailsArray.push(answer);rl.question('RoutingNumber: ', (answer) => { companyDetailsArray.push(answer); rl.question('Make Checks Payable To: ', (answer) => { companyDetailsArray.push(answer);rl.close(); invoice.companyDetails.push({ "yourName": companyDetailsArray[0], "companyName": companyDetailsArray[1], "addressLine1": companyDetailsArray[2], "addressLine2": companyDetailsArray[3], "addressLine3": companyDetailsArray[4], "addressLine4": companyDetailsArray[5], "addressLine5": companyDetailsArray[6],"phone":companyDetailsArray[7], "facsimile": companyDetailsArray[8],"website":companyDetailsArray[9], "email": companyDetailsArray[10], "currencyAbbreviation":companyDetailsArray[11], "beneficiary": companyDetailsArray[12], "bank":companyDetailsArray[13], "bankAddress": companyDetailsArray[14], "accountNumber": companyDetailsArray[15], "routingNumber": companyDetailsArray[16], "payableTo": companyDetailsArray[17] }); console.log("Invoice Company Information Stored");console.log("-----------------------\nFillin Invoice Items\n-----------------------") fillInvoiceItemsInformation();}); }); }); }); }); }); });});});});});});});});});}); }); });}
现在咱们已经有了用户的基础信息,咱们能够集合精神色集单个名目,并另命名为"fillInvoiceItemsInformation"函数。在每一个名目实行以前,咱们会询问用户是否要增添一个名目。如果他们连续输入"y",那末咱们将收罗该名目标信息,而后再次询问直到他们键入"n":
function fillInvoiceItemsInformation() { const rl = readline.createInterface({ input: process.stdin, output: process.stdout }); var invoiceItemArray = []; rl.question('Add item?(y/n): ', (answer) => { switch (answer) {case "y": console.log("-----------------------\nEnter ItemInformation\n-----------------------");rl.question('Quantity: ',(answer) => { invoiceItemArray.push(answer);rl.question('Details: ',(answer) => { invoiceItemArray.push(answer);rl.question('UnitPrice: ', (answer) => { invoiceItemArray.push(answer); invoice.invoiceItems.push({ "quantity":invoiceItemArray[0], "details": invoiceItemArray[1], "unitPrice": invoiceItemArray[2]});console.log("ItemInformation Added");rl.close(); fillInvoiceItemsInformation();});});});break;case "n": rl.close();return fillExcelFile();break;default:console.log("Incorrectoption, Please enter 'y' or 'n'."); } });}在收罗所有必须的用户信息后,咱们能够将其填入到Excel文件中:
function fillExcelFile() { console.log("-----------------------\nFilling in Excelfile\n-----------------------"); fillBillingInfo(); fillCompanySetup();}function fillBillingInfo() { var sheet = wb.getSheet(0); sheet.getCell(0, 2).value(invoice.generalInfo[0].invoiceNumber); sheet.getCell(1, 1).value(invoice.generalInfo[0].invoiceDate); sheet.getCell(2, 2).value(invoice.generalInfo[0].paymentDueDate); sheet.getCell(3, 1).value(invoice.generalInfo[0].customerName); sheet.getCell(4, 1).value(invoice.generalInfo[0].customerCompanyName); sheet.getCell(5, 1).value(invoice.generalInfo[0].customerStreetAddress); sheet.getCell(6, 1).value(invoice.generalInfo[0].customerCityStateZip); sheet.getCell(3, 3).value(invoice.generalInfo[0].invoiceCompanyName); sheet.getCell(4, 3).value(invoice.generalInfo[0].invoiceStreetAddress); sheet.getCell(5, 3).value(invoice.generalInfo[0].invoiceCityStateZip);}function fillCompanySetup() { var sheet = wb.getSheet(1); sheet.getCell(2, 2).value(invoice.companyDetails[0].yourName); sheet.getCell(3, 2).value(invoice.companyDetails[0].companyName); sheet.getCell(4, 2).value(invoice.companyDetails[0].addressLine1); sheet.getCell(5, 2).value(invoice.companyDetails[0].addressLine2); sheet.getCell(6, 2).value(invoice.companyDetails[0].addressLine3); sheet.getCell(7, 2).value(invoice.companyDetails[0].addressLine4); sheet.getCell(8, 2).value(invoice.companyDetails[0].addressLine5); sheet.getCell(9, 2).value(invoice.companyDetails[0].phone); sheet.getCell(10, 2).value(invoice.companyDetails[0].facsimile); sheet.getCell(11, 2).value(invoice.companyDetails[0].website); sheet.getCell(12, 2).value(invoice.companyDetails[0].email); sheet.getCell(13, 2).value(invoice.companyDetails[0].currencyAbbreviation); sheet.getCell(14, 2).value(invoice.companyDetails[0].beneficiary); sheet.getCell(15, 2).value(invoice.companyDetails[0].bank); sheet.getCell(16, 2).value(invoice.companyDetails[0].bankAddress); sheet.getCell(17, 2).value(invoice.companyDetails[0].accountNumber); sheet.getCell(18, 2).value(invoice.companyDetails[0].routingNumber); sheet.getCell(19, 2).value(invoice.companyDetails[0].payableTo);}为了防范用户增添的数目高失事件表最年夜行数,咱们能够在事件表中主动增添更多行。在配置数组中表单中的名目以前,默认增添行:
function fillInvoiceItems() { var sheet = wb.getSheet(0); var rowsToAdd = 0; if (invoice.invoiceItems.length > 15) { rowsToAdd = invoice.invoiceItems.length - 15; sheet.addRows(22, rowsToAdd); } var rowIndex = 8; if (invoice.invoiceItems.length >= 1) { for (var i = 0; i 在事件簿中填写完信息后,咱们能够将事件簿导出到Excel文件中。为此,咱们将应用excelio关上性能。在这种状况下,只要将日期输入文件名就可:
function exportExcelFile() { excelIO.save(wb.toJSON(), (data) => { fs.appendFileSync('Invoice' + new Date().valueOf() + '.xlsx', newBuffer(data), function (err) {console.log(err); }); console.log("Export success"); }, (err) => { console.log(err); }, { useArrayBuffer: true });}实现的文件将下列所示:


网友评论
lnrbeplvog
回复实用教程Node.js+SpreadJS:从服务端快速生成Excel电子表格一书,深入浅出、操作性强!
思念静置了时间
回复这本次创作的实用教程:Node.js+SpreadJS从服务端生成Excel电子表格相当宝贵且富指导意义,本书兼顾技术实操与应用需要开发者的实际需求,对于那些希望在服务器上快速创建和操作复杂数据报表的开发者来说是一本不可多得的参考书目!
oxorbtdoy
回复JS,快速且强大!让网页动态化不再是难题。
luepzkm
回复您的一系列付(pré)出,是我成长道路上的指路灯,您的一生虽然充满艰难挑战和不断前行的勇敢。